


Multi-floor Space Capture
Overview
This article serves as a comprehensive guide to multi-floor space capture with the Galois device, detailing step-by-step operational workflows to obtain an accurate and seamless VR space.
1. Scanning Guide (Including Staircase Space)
【First Floor Scanning】
- After creating a new project, proceed with the first-floor scanning following Galois standard capture procedures.
- Once the first floor is completed, continue scanning on the staircase. Adjust the tripod legs to a "two-long, one-short" configuration to ensure the device remains level on the stairs.
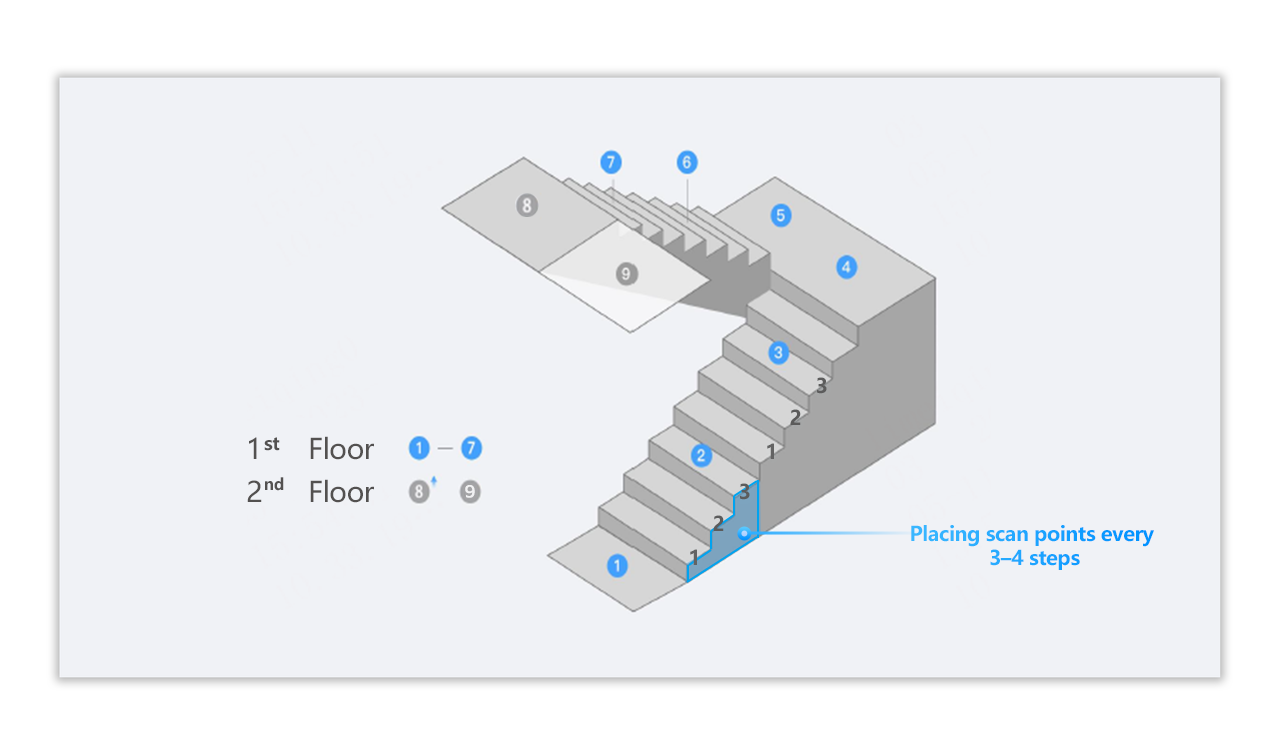
- It is recommended to place scanning points every 3–5 steps—spacing them too far apart may affect the smoothness of exploring in VR Tour.
Note: All staircase captured points should be assigned to the first floor.

【Second Floor Scanning】
- After completing the capturing of the last point on the staircase, tap the Floor Management function in the upper-right corner.
- Then click Settings and select Add a new floor (up) or Add a new floor (down) to create a new floor.

- After adding the new floor, begin by capturing the first point of the second level. Proceed with the rest of the second-floor scanning following standard Galois capture procedures.
- Please refer to the picture below about the detailed points placement between two levels. Points 1-7 belong to the 1st floor space, and point 8-9 belong to the 2nd floor space.
2. Scanning Guide (Without Staircase Space Capture) (Optional)
Users can consider skipping staircase scanning when:
- The stairwell is too narrow for equipment operation.
- Project requirements exclude staircase areas.
- Other special circumstances.
Important Notes: Skipping staircase scanning will result in these limitations
- Smoothing floor-to-floor walking in VR tour will be unavailable.
- Floor switching only available by selecting the floor.
Recommendation:
- For optimal VR tour navigation experience, please capture the full staircase unless there are special circumstances.
Please refer to the below detailed steps about the scanning without staircase space
【First Floor Scanning】
- Create a new project.
- Scan first floor per standard Galois capture procedures.
【Staircase Space】
- Skip this step entirely.
【Second Floor Scanning】
- After completing the 1st floor, tap the Floor Management function in the upper-right corner.
- Then click Settings and select Add a new floor (up) or Add a new floor (down) to create a new floor.
- Start scanning the second floor per standard Galois capturing procedures.

3. How to adjust the points by "Floor Adjustment" Feature
Since staircase data was not captured, the system cannot automatically determine spatial relationship between floors. Follow these steps for floor adjustment:
- Enter the capture page in the App.
- Tap the Toolbox icon (bottom-right corner).
- Select Floor Adjustment from the menu.
Height Adjustment: Select 'Height' in the upper of the page
- Use the vertical slider on the right side.
- Adjust until floors's height align with actual building elevation.

Align Adjustment: Select 'Align' in the upper of the page
- Complete the floor adjustment according to the actual space structure by moving or rotating the floors.

When adjustments are complete, click Save in the upper right corner.

4. Notice
4.1 Tripod Installation and Adjustment
Before installing the equipment, make sure that the tripod is stable and then screw the various knots of the tripod tightly to avoid damage to the equipment caused by the tripod's instability. Especially in the staircase space, when the tripod spans multiple steps, it must be kept stable.
4.2 Space Connectivity
When capturing the staircase, if there is a door in the passage, the door should be opened in advance to avoid the failure of spatial connectivity or model misalignment due to the unopened door.
4.3 Capturing Sequence
When capturing, it is recommended to capture the points from the bottom layer up sequentially, and the operation will be smoother and easier.
5.Multi-Floor VR project Display Interpretation
For VR products with multi-floor structure, the 3D Tour will provide corresponding display functions. The details are as follows:
【Explore】
- Point-based Navigation: Simulates real walking, allowing users to explore multiple floors within the space.
- Floor Switching: Users can select the corresponding floor to quickly jump to the target level.

【3D Model】
Users can view either the entire model or a single floor’s model by selecting in the display control area on the right side of the page.
- "All" Mode: The full 3D model of the entire space is displayed normally.
- "Single Floor" Mode: Only the selected floor’s 3D model is displayed normally, while other floors become transparent and non-interactive.


❓ Still have questions?
If this guide didn't quite solve your specific case, our team is here to help. Get in touch for more tailored guidance:
💬 Chat with our Product Specialist, Lutina, via WhatsApp: https://wa.me/message/NOOEFYVCDCXPP1
📧 Email us: Support@realsee.ai
We usually respond within 24 hours.